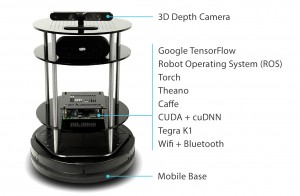
The Autonomous Deep Learning Robot from Autonomous Inc is a bargain price Turtlebot 2 compatible robot with CUDA-based deep learning acceleration thrown in. It’s a great deal – but the instructions are sparse to non-existent, so the idea of this post is to both review the device and fill in the gaps for anyone who has just unpacked one. I’ll be expanding the article as I learn more.
First, a little about the Turtlebot 2 compatibility. Turtlebot is a reference platform intended to provide a low-cost entry point for those wanting to develop with ROS (Robot Operating System). ROS is essential for doing anything sophisticated with the robot (e.g. exploring, making a map). There are various manufacturers making and selling Turtlebot-compatible robots all based around the same open source specifications. In actual fact, the only really open source part of the hardware is a collection of wooden plates and a few metal struts. The rest comprises a Kobuki mobile base and a Kinect or ASUS Xtion Pro 3D camera. Read a good interview with the Turtlebot designers here. On top of this, Autonomous throw in a bluetooth speaker and an Nvidia Jetson TK1 motherboard instead of the usual netbook.
Additional Components Required
These are not mentioned in the instructions or included in the kit, but you’ll need them:
- Ethernet cable (to do the initial log on and Wifi configuration. You might alternatively be able to use an HDMI cable and keyboard)
- USB type A to type B. You’ll need this to connect the Kobuki base to the Jetson TK1.
Unboxing
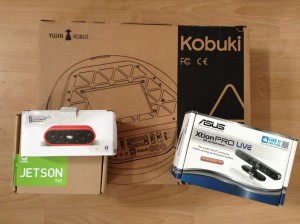
That explains the first surprise on opening the Deep Learning Robot (henceforth, DLR): the shipping container contains a series of boxed products (Kobuki, Jetson TK1, ASUS Xtion Pro, bluetooth speaker), a few bits of wood and little else. The only proprietary piece of hardware is a small piece of plastic which shields the TK1 and has the Autonomous logo on it. So if you laser cut this item or dispensed with it, you could likely buy the components separately and put the entire kit together yourself. But I don’t think it would be significantly cheaper, so why bother? Autonomous claim to be selling this at cost and I believe them, given the price of other, less powerful Turtlebots on the market. I ordered the option with a Kobuki recharging station so that was in the box too.
The Deep Learning Robot Components
The Kobuki mobile base is by the Korean firm Yujin Robot. Download the brief Kobuki user guide as a PDF here. The mobile base has two wheels, IR range and cliff sensors, a factory-calibrated gyroscope, a built-in rechargeable battery and various ports for powering the rest of the robot and for communications. This takes care of the mobility and odometry robot hardware, which I know from bitter experience is painful to put together yourself.
The nVidia Jetson TK1 is a small embedded PC, rather like a souped-up Raspberry Pi. At $200, the principal advantage it has over the Pi is a powerful GPU intended for accelerating machine-learning applications rather than displaying graphics. CUDA is the API for this, and the various “deep learning” applications installed on the robot all use CUDA to accelerate their performance. This board is what enables the device to do image recognition, deep learning and so on. It also includes built-in WiFi and Bluetooth. The operating system is Ubuntu.
The ASUS Xtion Pro is the successor to the Kinect, which was a popular peripheral for those frittering away their time with the xBox. The Kinect was part of the spec for the Turtlebot 1 and 2, but required a fiddly cable modification. The Xtion Pro simply plugs into Jetson TK1 via a passive USB hub, which is also included in the kit. The device is a camera that can stream both RGB video and a depth overlay, which shows the distance to the nearest object at each pixel. This is essential for Simultaneous Localization and Mapping (SLAM) in ROS.
The Bluetooth Speaker is just that. It has its own internal battery and requires no connections whatsoever. It is also the only part of the robot that will not get recharged when the robot docks with the Kobuki recharging station.
The Kobuki recharging station is a mystifying empty black box that comes with no instructions. There is a separate power supply for the Kobuki that can be used directly with the robot or connected to the recharging station.
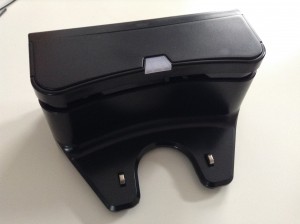
The Kobuki recharging station.
Some bubble-wrap encloses what I presume are standard Turtlebot 2 hardware: three wooden discs and a series of struts to support them.
Finally, the value add! A small piece of plastic that sits over the Jetson TK1 on four struts, protecting it and displaying the words “I am Autonomous”.
Assembly
The 7 page assembly instructions are adequate. They’re the sort of thing you get with an IKEA set of shelves: no words, just diagrams. However, they’re incomplete.
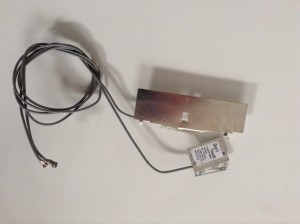
My TK1 came with a couple of odd bits of metal attached to a PC card. I found no reference to these anywhere, so I removed them. As it turns out, they’re the WiFi antenna. The WiFi works without them, but cuts out once the robot starts to move. So leave them attached!
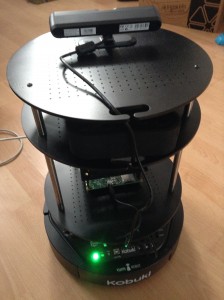
Assembling the pieces took me around 30 minutes and was straightforward. It took some effort and expletives to screw the metal struts in, particularly the ones that stacked on top of other struts, but I’m not a hardware guy.
The Bluetooth speaker and ASUS Xtion Pro just sit on their respective discs; they’re not screwed down at all. I’ll look for some way of fixing them at a later date.
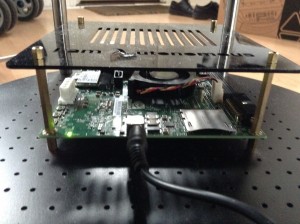
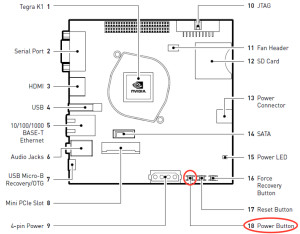
I was mystified to begin with that the Jetson TK1 would not always power up. I even thought I had a faulty board until I discovered it has a small power switch. Press that, and the board will turn on:
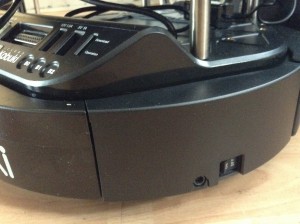
Not mentioned in the instructions is how to put the Kobuki recharging station together. Take the back off the device and thread the power supply lead through the hole at the left and up into a connector on the roof of the compartment:
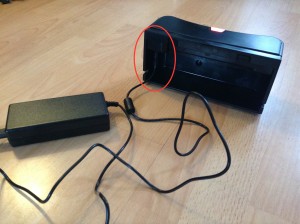
The cable goes in the left hand hole (viewed from the rear) and then up into the socket in the compartment roof.
If you don’t have the recharging statement, or just want to charge the robot directly, plug the power supply directly into the power socket on the robot just by the power switch.
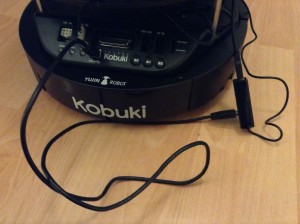
Another thing not mentioned in the instructions is that you need an additional USB cable (type A to type B) to plug the Jetson TK1 into the Kobuki in order to control it and receive odometry information:
Quick Test
Who wouldn’t be impatient to see a brand new robot scuttle around the floor? There’s a trick in the Kobuki manual for just this situation. You switch on the robot using a power switch on the rim (this is not shown in any of Kobuki or Autonomous’ instructions!) and then press the B0 button for two seconds. My Kobuki was already semi-charged out of the box. The robot then hurtles around the floor at random, merrily crashing into anything it finds. In theory the cliff sensors would stop the robot falling down stairs, but I don’t intend to test that.
It’s noisy!
First Log On
To log on to the Jetson TK1, you’ll need to access it first via ethernet. So plug one end of an ethernet cable (not included) into the Jetson TK1 and the other end into your home router.
The IP address will be assigned to the Jetson TK1 via DHCP. In theory you should be able to do
ping tegra-ubuntu
to find the device, but that didn’t work for me. The hostname tegra-ubuntu resolves to 81.200.64.50 on my home network for reasons that are unclear, whereas the robot actually picked up the address 192.168.0.10. I found that out by logging onto my router and looking at the table of connected devices.
So in my case, the first login was made as follows:
ssh ubuntu@192.168.0.10
You should of course use your own IP address or ubuntu@tegra-ubuntu if that works for you. I’m using a Mac, so opening a Terminal window allows me to type this command and all of the following. PC users should look for Putty or a similar terminal program.
So the ssh user is ubuntu and the password is also ubuntu. Super secure! You may get a message along the lines of
The authenticity of host '192.168.0.10 (192.168.0.10)' can't be established.
ECDSA key fingerprint is SHA256:JWn6s2+PahObnUzGonY+piCuuPY7EVscPf67TYmj1GU.
Are you sure you want to continue connecting (yes/no)? yes
in which case just say yes.
You’re now logged onto the robot at the command line level.
When you want to finish a session, I recommend you do the following command before switching the robot off:
sudo shutdown 0
This is to save the Flash file system from being turned off in the middle of a write operation.
Configuring WiFi
The supplied Jetson TK1 comes with WiFi and Bluetooth, so you’ll just need to configure it for your own WiFi network.
First, log in again to the robot as detailed in the previous section. Then check the WiFi is working with the Network Manager by typing:
nmcli dev
You’ll get a list of network devices including the ethernet port and the wifi device:
DEVICE     TYPE              STATE
eth2       802-3-ethernet    connected
wlan2      802-11-wireless   disconnected
Now connect to your local 2.4Ghz Wifi network (I couldn’t get it to work with a 5Ghz one) by typing:
sudo nmcli dev wifi connect <YOUR_SSID_HERE> password <YOUR_KEY_HERE>
If your SSID has spaces in, then enclose it in quotes, e.g. ‘My network’. As usual with sudo commands you’ll be asked to authenticate with the ‘ubuntu’ password. Assuming you have no error message, then typing
nmcli dev
should show you connected:
DEVICE     TYPE              STATE
eth2       802-3-ethernet    connected
wlan2      802-11-wireless   connected
If that is so, then all you need is the IP address of the WiFi interface:
ifconfig
Look for the wlan2 section to find the IP address. Here’s mine, which was on a separate network:
wlan2     Link encap:Ethernet  HWaddr e4:d5:3d:17:13:4b
          inet addr:10.0.1.2  Bcast:10.0.1.255  Mask:255.255.255.0
Type
exit
to break the connection and then try logging in via the WiFi interface with the IP from the last step:
ssh ubuntu@10.0.1.2
Substitute your own IP address, of course. This actually gave me a scary message, telling me the RSA key had changed and asking me to add it to a list of hosts on my Mac. I think this is specific to my setup so I’ll spare you the details. Ask me in the comments if this happened to you.
Once you’ve logged in via the WiFi interface you can dispense with the ethernet cable. Your robot is unchained.
If you have a Mac, then you can simplify access and file sharing on your Autonomous Deep Learning Robot by following this guide.
Change The Robot’s Name
This is the standard procedure for renaming an Ubuntu box. Use VIM to edit /etc/hostname and /etc/hosts
sudo vim /etc/hostname
sudo vim /etc/hosts
Replace ‘tegra-ubuntu’ with a new name. If you’re not familiar with Vim, then type ‘i’ to start editing at the cursor position, then ESCAPE and :wq! to save or ESCAPE and :q! to quit without saving. More on Vim here.
Changing Your Password
It’s possible that ubuntu/ubuntu is not the most secure of credentials, right? You change your main password with
passwd
and the sudo password separately:
sudo passwd
In both cases you’ll be asked for your current password first, then the new password.
Sound
I have not, as yet, had much success with the Bluetooth Speakers. This appears to be a general issue with connecting to Bluetooth speakers on Ubuntu. The best workaround I’ve found so far is to log on locally with an HDMI cable, mouse and keyboard, open a terminal and type:
sudo pactl load-module module-bluetooth-discover
At that point, you can pair the speakers with the motherboard (with a charming lisp), they’ll appear in the list of sound devices in Ubuntu and you can select them as the preferred sound device. You now have sound output.
However, this solution only lasts for the current session and it’s clearly impractical to do this every time you switch on the robot. Maddeningly, you can’t do this via a remote ssh session, it has to be a local one. Suggestions from Ubuntu gurus would be very welcome!
Autonomous recently wrote me that they couldn’t get it to work reliably either, and suggested using an audio cable to connect the TK1 with the speaker. I’ll test this soon.
USB Issues with the Asus Xtion Pro and Kobuki
One issue that kept cropping up was apparent USB communication difficulties between the Jetson and the Kobuki and ASUS Xtion Pro. The chief symptom is that the Kobuki spontaneously disconnects (with its characteristic descending tinkle sound) around 20 seconds after it connects using minimal.launch (see “Testing ROS” below). The ASUS Xtion Pro would also show a grey square when the video was streamed to a workstation (although this can also be caused by misconfigured networking).
The conclusion I came to is that these problems only occur when the Kobuki battery is low. Once the battery is recharged, the problems disappear. Note that plugging the power cable in will not solve the problem, the battery actually needs to be fully charged up again.
Testing ROS
One of the great things about buying this kit as opposed to putting it together yourself is that all the software you need is pre-installed. Dante describes a special circle of Hell where sinners have to try compiling ROS on ARM devices; this is not how you want to spend your life. So let’s celebrate the pre-installed software by doing a “hello world” for our Turtlebot.
Open an SSH connection over Wifi to your robot and type:
roslaunch turtlebot_bringup minimal.launch
This will boot up ROS and the minimal Turtlebot software.
Then open a second simultaneous SSH connection and type:
roslaunch turtlebot_teleop keyboard_teleop.launch
This will bring up a key map that allows you to drive your robot remotely:
Control Your Turtlebot!
---------------------------
Moving around:
   u    i    o
   j    k    l
   m    ,    .
Make sure this second terminal window is in focus when you press the keys.
Once you can do this you can be satisfied that you have a solid ROS platform for further exploration. I’d suggest the Turtlebot tutorials on the Turtlebot site as a good place to continue from here. Note that you do NOT need to install ROS on your robot, it’s already done. The test I just described was actually Lesson 6.
To complete the tutorials you will need to do a second installation of Ubuntu and ROS on a separate desktop or laptop (see my guide). This is for remote control and monitoring of the robot using the graphical tools like rviz. I’ve used both VMWare Fusion and VirtualBox to host Ubuntu and ROS on my Mac and they both work fine. There are tutorials out there on how to install ROS on MacOS X; my strong suggestion is not to bother. It’s another circle of Hell and life’s too short.
The tutorials will take you all the way through autonomous navigation, Simultaneous Localization and Mapping (SLAM) and the basic ROS features. Beyond that, you have the ROS Wiki and the hundreds of open source packages to explore.
Testing Caffe
Caffe is a tool for creating and running CUDA-accelerated neural networks. The most important thing it can potentially do for your robot is allow it to recognise objects in photographs or video streams.
Neural networks were fashionable when I was at university and then nothing much happened for 25 years (that dates me). They’ve had a renaissance in the last few years thanks to cheap GPUs and enormous datasets and are now the tool of choice for most AI-related problems. Caffe is bleeding edge and many of the “deep learning” stories that surface in the media refer to projects running on this software. So our robot really is well equipped.
It’s frustrating trying to get to “hello world” with Caffe, but here’s what worked for me.
First, ssh into the robot and install the Python dependencies:
cd ~/caffe/python
for req in $(cat requirements.txt); do pip install $req; done
sudo pip install pandas
Now download the default Imagenet model. This will take some minutes:
cd ~/caffe/data/ilsvrc12/
./get_ilsvrc_aux.sh
Now patch lines 253-254 of the Caffe Python library following these instructions on StackOverflow (I know, I know).
Finally, download my mashup of the classify.py (saves an npy file but doesn’t print the results to the console) and the Jetapac fork of this file (which prints the results but isn’t compatible with the latest version of Caffe) called test_classify.py. This version is terser to call and doesn’t bother saving the spy file. Place this file in the caffe/python directory.
Now to classify a single still image try:
cd ~/caffe
python python/test_classify.py examples/images/cat.jpg
You’ll get a lot of log messages and this at the end:
Loading file: examples/images/cat.jpg
Classifying 1 inputs.
Done in 5.20 s.
python/test_classify.py:149: FutureWarning: sort(columns=....) is deprecated, use sort_values(by=.....)
 labels = labels_df.sort('synset_id')['name'].values
[('tabby', '0.27933'), ('tiger cat', '0.21915'), ('Egyptian cat', '0.16065'), ('lynx', '0.12844'), ('kit fox', '0.05155')]
Those are the top 5 results that Caffe has produced; ‘tabby’ is the closest match. A lot of work and patching, but it’s impressive. Now copy your own photos to caffe/examples/images and give it a go!
There is a module called ros_caffe out there that supposedly integrates Caffe into ROS, but I haven’t tried it out yet. It will probably merit a separate post.
Testing OpenCV
OpenCV is an open source library for computer vision. CUDA-accelerated OpenCV works out of the box on the Jetson TK1 that comes with the robot.
To get started with OpenCV and produce a “Hello World”, follow the OpenCV 101 Tutorial 0 on the nVidia Developers’ site.
Next Steps
Try setting up a ROS Workstation on your local PC or Mac. This will allow you to use visualisation tools like RVIZ, do SLAM and autonomous navigation. Also consider adding more storage space to your robot.
Preliminary Conclusions
For those looking for a platform to get going with ROS and neural networks, this is an absolute bargain. Autonomous are selling for $1000 and typical Turtlebots are at least $1800.
Having said that, there is a steep learning curve here, not helped by the absence of any instructions. Hopefully this post and others I’ll write will help to some extent, but robotics is still for Linuxheads, not normal humans. Setting up a ROS workstation and networking with the robot is fiddly. Getting to “Hello World” on Caffe was a pain. So you’ll need to dedicate time to even get up to the point where you can run the introductory tutorials for ROS and Caffe.
I’ve spent a lot of time building robots and messing with Arduinos, Pis, C++ and interrupts to get devices that sort of work. This robot does work and lets you get straight to fooling around with the hard problems like SLAM and object recognition; you can really attack the software part of the stack. If that sounds like your idea of fun, then buy this robot.
…TO BE CONTINUED…
That leaves Google TensorFlow to try out, which I’ll be exploring soon. I’ll be updating this post once I get to “hello world”.
Update 2nd March 2016: Added note about USB issues. Also updated the sound issue.
