Once you’ve completed the missing instructions for your Deep Learning Robot to get the various “Hello Worlds” running, you’ll soon want try using some of the ROS visualization tools. To do this, you’ll need ROS installed on a laptop or workstation and get it networked with the robot. The Turtlebot tutorials do describe this, but I ran into various issues. Hopefully, this guide will help others who tread the same path.
Overview
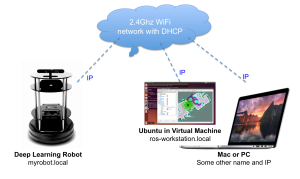
This is the setup we’re shooting for:
The robot and ROS Workstation and host PC or Mac all have dynamic IP addresses assigned by DHCP on your router. To avoid having to keep track of IP addresses we use zeroconf to refer to them as “myrobot.local” or whatever your robot happens to be called. ROS enthusiasts seem to prefer hard-coding IP addresses for reasons that escape me.
Here are the steps we will to follow:
- Create your ROS Workstation: an Ubuntu installation running in a virtual machine on your PC or Mac
- Set up zeroconf networking on both the robot and workstation, and check it.
- Set up ROS networking on both the robot and workstation, and check it.
- Run a few cool demos to reward ourselves for our efforts.
Reserve yourself a quiet afternoon to do this.
Create Your ROS Workstation
Why do you need a second ROS installation? We have a perfectly good setup on the robot itself, so why not just do everything remotely? The answer is that sooner rather than later you’ll want to use RVIZ for visualising video, navigation and the like. You could in theory do this via VNC or some other remote desktop client, but I didn’t manage to get it working and it would put more strain on your robot and bandwidth.
If you have an old PC or Mac that you can overwrite with Ubuntu 14.04 then that would be a good solution and likely give you better performance. Failing that, you’ll need a virtual machine with Ubuntu on your current everyday machine. Do not, repeat, do not attempt to install ROS on Windows or OS X; you will pass through all kinds of torments before giving up.
On my Mac I have used both VMWare Fusion (paid) and VirtualBox (free) to run a virtual Ubuntu. I have found no real difference between the two (they both suck), so I recommend VirtualBox. At least you won’t get repeatedly bled for “updates” that don’t solve basic problems like the unreliability of copy/paste between host and guest operating systems. You’ll get unreliability for free instead.
Install VirtualBox on your system and then follow this guide to install Ubuntu on the VM. Make sure you select the image for Ubuntu 14.04; avoid other versions.
Once you can log on to Ubuntu, then install ROS Indigo. You could install the newer ROS Jade, but the robot comes with Indigo which is a “Long Term Support” release and my tendency is to keep the same version of ROS on both machines.
Networking Configuration on the Virtual Machine
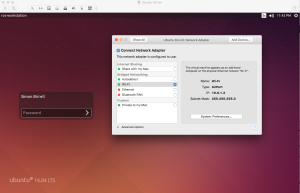
Once you have a virtual Ubuntu running, you’ll need to decide how to network it. On my setup I have the VM appear as a separate device on the network with its own IP address. This is so the robot can find it and stream data. Here’s my configuration on VMWARE Fusion (Virtual Machine > Settings > Network Adapter):
I would also recommend giving the Ubuntu guest system a recognisable name. To do this, log on to Ubuntu and use VIM to edit /etc/hostname and /etc/hosts
sudo vim /etc/hostname
sudo vim /etc/hosts
Replace the existing name (e.g. ‘ubuntu’) with a new name; I use “ros-workstation”. If you’re not familiar with Vim, then type ‘i’ to start editing at the cursor position, then ESCAPE and :wq! to save or ESCAPE and :q! to quit without saving. More on Vim here.
Set up zeroconf networking on both the robot and workstation
My next recommendation is to get zeroconf (“Bonjour” for Mac users) set up on both devices. You can work with static IP addresses and indeed many ROS people seem to do just that. But in a world where every home or office router uses DHCP to generate dynamic IPs, why would you bother? As soon as you move to a new location, you’ll have to change all your IPs. Better to let the infrastructure take care of that and write
ssh ubuntu@myrobot.local
rather than
ssh ubuntu@192.168.0.7
and have to change that every time you get a new IP address.
Fully setting up your robot to work with a Mac is described here. If you’re on a PC, ssh into the robot and do the following to install zeroconf:
sudo apt-get install netatalk
sudo apt-get install avahi-daemon
sudo update-rc.d avahi-daemon defaults
A Windows PC will also need Bonjour (the Apple branding of zeroconf) installed. The quickest way to do that is to install iTunes on Windows and then check.
Check Zeroconf works on both Machines
I assume for the rest of the post that when following the Missing Instructions you renamed your robot as “myrobot” and you have renamed your ROS Workstation Ubuntu as “ros-workstation”. Substitute your own names in all the following.
Log on to Ubuntu on your ROS workstation.
ping myrobot.local
You should get a reply similar to this:
PING myrobot.local (10.0.1.5) 56(84) bytes of data.
 64 bytes from 10.0.1.5: icmp_seq=1 ttl=64 time=22.9 ms
If not, check
- You’re both on the same WiFi network
- You have substituted your robot name for ‘myrobot’
- Zeroconf is installed on your robot
- Zeroconf is installed on your ROS Workstation Ubuntu
- Bonjour is installed on your ROS Workstation if the host OS is Windows
Then check that it can see itself:
ping ros-workstation.local
Now ssh into the robot and try the reverse test:
ping ros-workstation.local
You should get a similar reply. If not, recheck the above list and also check that
- Your VM is networked so that Ubuntu appears on the network with its own IP address
Finally, check that the robot can see itself:
ping myrobot.local
These tests must work before anything else will. The zeroconf may seem an unnecessary complication now, but it will pay off very quickly.
Setting Up ROS Networking
Now that we’ve set up and tested networking at the Ubuntu / zeroconf layers, we can concentrate on getting ROS properly networked.
There are two key environment variables that need to be set up correctly on each machine. They are:
- ROS_MASTER_URI – The URL where local ROS nodes need to go to connect to the ROS Master.
- ROS_HOSTNAME – The hostname that ROS nodes on other machines in the network should use to contact this machine.
Here are the values to use (substituting your names as appropriate):
| Environment Variable | Deep Learning Robot | ROS Workstation |
|---|---|---|
| ROS_MASTER_URI | http://localhost:11311 | http://myrobot.local:11311 |
| ROS_HOSTNAME | myrobot.local | ros-workstation.local |
The ROS Workstation will use http://myrobot.local:11311 to contact the ROS master running on the robot. The robot will contact itself using http://localhost:11311. The robot will tell others that it should be addressed using the hostname myrobot.local and the ROS Workstation will similarly ask to be addressed as ros-workstation.local. We’ve tested that these combinations actually work in the previous section.
The simplest way to ensure that these environment variables are always set is to add them to the .bashrc file on the robot and on the ROS Workstation Ubuntu. They will get set with every terminal or ssh window that you open. To do this, use VIM or your preferred text editor.
On the robot:
cd ~
vim .bashrc
Go to the end of the file, type i to go into edit mode and paste the following (substituting your names):
export ROS_MASTER_URI=http://localhost:11311
export ROS_HOSTNAME=myrobot.local
Save, exit and close the ssh session. Open a new ssh session and check that the following commands return the expect values:
printenv ROS_MASTER_URI
printenv ROS_HOSTNAME
On the ROS Workstation:
cd ~
vim .bashrc
Go to the end of the file, click i to go into edit mode and paste the following:
export ROS_MASTER_URI=http://myrobot.local:11311
export ROS_HOSTNAME=ros-workstation.local
Save, exit and close the terminal window. Open a new terminal window and check that the following commands return the expect values:
printenv ROS_MASTER_URI
printenv ROS_HOSTNAME
With this, your ROS installations should be configured correctly.
Your Reward for All This: Video Streaming and a Point Cloud
You’ve installed a virtual machine, installed ROS, set up networking and environment variables. You’ve dedicated an afternoon of your life to this. All for what?
For a start, we should be able to see the robot’s camera output on the ROS workstation.
ssh into the robot and type:
roslaunch turtlebot_bringup minimal.launch
then start a second ssh session and type:
roslaunch turtlebot_bringup 3dsensor.launch
and a third ssh session and type:
roslaunch turtlebot_teleop keyboard_teleop.launch
On the ROS workstation type:
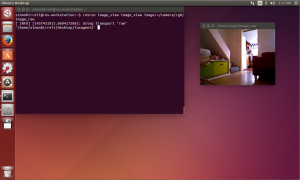
rosrun image_view image_view image:=/camera/rgb/image_raw
You should get a window launched with the video feed.
If you get a grey box instead, then verify the following:
- That the environment names are set correctly, particularly ROS_HOSTNAME on the robot. Use printenv to check as in the previous section.
- That the battery is fully charged up. As I’ve said elsewhere, both the Kobuki and Xtion top working correctly when the battery is low. Plugging into the power is not enough; the battery must be charged.
Now bring the third ssh window with the keyboard_teleop node into focus and use the keyboard to drive around and spy on your family.
Once that’s working, try this on the ROS Workstation:
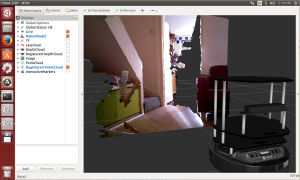
roslaunch turtlebot_rviz_launchers view_robot.launch
This will launch RVIZ, ROS’s principal visualisation tool. RVIZ often crashes the first time you launch it, and the official instructions are to simply try it again if this happens (can you believe open source?). Click and use the mouse to rotate the model of your robot.
Now look for the checkbox labelled “Registered Point Cloud” and select it. Look for the point cloud that appears after a few seconds. Each point is a pixel of the camera viewport, mapped into 3D space. Pretty cool.
You’ll notice that the floor in the point cloud seems to have sunk below the level of the floor in the 3D space. Examining the model carefully, you’ll see that this is because the ASUS Xtion Pro is positioned higher on the Deep Learning Robot than on the standard Turtlebot. At some point I’ll need to correct the model.
Please use the comments section to tell me about any problems you encounter. The point of these posts is to make things easier for you than they were for me.
In a future post, I’ll show you how to use this setup to map your house using SLAM and then autonomously navigate around it.
A Digression on Text Expansion
You may notice that you’re starting to do an awful lot of typing each time you launch ROS nodes. My good friend Ben Tristem gave me a tip which has saved me no end of time on the Mac – use a text expansion utility like Text Expander. This means you can type a short code like
;tb
and it will expand into
ssh ubuntu@dali.local
roslaunch turtlebot_bringup minimal.launch
which will automatically log on to the robot and start up the basic Turtlebot nodes. Optional, but highly recommended for your fingers and your sanity. I trust Windows users can find something similar.


